Are you tired of tripping over dumbbells scattered across your home gym floor, or perhaps frustrated by the high cost of commercial weight racks that don’t quite fit your space or style? Creating a DIY wood rack for your dumbbell set offers a perfect solution, blending functionality with a touch of personal craftsmanship. This guide will walk you through the entire process, from initial planning and design to a step-by-step construction, ensuring you build a sturdy, custom storage solution that perfectly complements your fitness routine and aesthetic. Let’s transform your workout area into an organized and inspiring space.
Why Build Your Own Dumbbell Rack?
Embarking on a DIY dumbbell rack project offers a compelling array of benefits beyond just tidying up your workout space. Primarily, the cost savings can be significant. Commercial dumbbell racks, especially those designed for a full set of weights, can be surprisingly expensive, often reaching hundreds of dollars. By sourcing your own materials and investing a bit of time, you can construct a high-quality rack for a fraction of the price.
Secondly, customization is a major advantage. Unlike off-the-shelf options, a DIY rack can be tailored precisely to the dimensions of your specific dumbbell set – whether you have fixed hex dumbbells, adjustable sets, or a mix of both. You can also design it to perfectly fit the unique layout and available space in your home gym, garage, or even a compact corner of a room. This bespoke approach ensures maximum efficiency and an uncluttered environment. Finally, there’s immense satisfaction in building something with your own hands. Completing a functional, robust piece of equipment that enhances your fitness routine provides a sense of accomplishment and pride, making your workout space truly your own.
Planning Your Dumbbell Rack: Essential Considerations
Before you cut the first piece of wood, thorough planning is paramount to ensure your DIY dumbbell rack is both functional and safe. This preparatory phase involves assessing your current equipment, available space, and understanding the materials and tools you’ll need.
Assessing Your Dumbbell Set
Start by carefully inventorying your dumbbells. Note the type (fixed weight, adjustable, hexagonal, round), the dimensions of each dumbbell (especially the handle length and the diameter of the weight plates), and the total cumulative weight of your entire set. This information is crucial for determining the overall size, strength requirements, and specific design features (like spacing between shelves or pegs) of your rack. Ensure you account for any future additions to your collection.
Space Evaluation
|
Our Picks for the Best Dumbbell Set in 2026
As an Amazon Associate I earn from qualifying purchases.
|
||
| Num | Product | Action |
|---|---|---|
| 1 | Fitvids Set of 6 Neoprene Dumbbell Hand Weights, Set with Rack: 2/3/5 Pairs |

|
| 2 | CAP Barbell 150 LB Coated Hex Dumbbell Weight Set with Vertical Rack | Multiple Options |
|
| 3 | PowerBlock Elite EXP Adjustable Dumbbells, Sold in Pairs, Stage 1, 5-50 lb. Dumbbells, Durable Steel Build, Innovative Workout Equipment, All-in-One Dumbbells, Expandable with Expansion Kits |
|
| 4 | Adjustable Dumbbells, 20/30/45/70/90lbs Free Weight Set with Connector,5 in1 Dumbbells Set Used as Barbell,Kettlebells,Push up Stand,Fitness Exercises for Home Gym Suitable Men/Women |
|
| 5 | Amazon Basics Neoprene Dumbbell Hand Weights for Exercise and Muscle Toning |
|
| 6 | Amazon Basics Neoprene Dumbbell Hand Weights for Exercise and Muscle Toning |
|
| 7 | Adjustable Dumbbell Set, 20/33/45/70/90lbs Free Weight Set with Connector, 4 in1 Dumbbells Set Used as Barbell, Kettlebells, Push up Stand, Weight Set for Home Gym Suitable Men/Women |
|
| 8 | Amazon Basics Neoprene Dumbbell Hand Weights for Exercise and Muscle Toning |
|
| 9 | Adjustable dumbbell set,20/35/45/55/70/90lbs Free Weights set with upgraded nut, 5 in 1 Weight Set Used as Kettlebells, Barbell, Push up Stand, Fitness Exercise for Home Gym Suitable Men/Women |
|
| 10 | Adjustable Dumbbells Set of 2,Free Weights Dumbbells Set,Adjustable Dumbbell Set,52.5 lbs pair 105 lbs,15 in 1,for Men/Women Gym Equipment for Home Strength Training Equipment |
|
Next, examine the area where the rack will reside. Measure the available floor space (width and depth), and consider any height constraints (e.g., low ceilings, wall-mounted TVs). Think about how the rack will integrate with other gym equipment and ensure there’s ample clearance to easily access and re-rack your weights without obstruction. If floor space is extremely limited, you might explore wall-mounted designs as an alternative, though these often require sturdy wall studs and a different construction approach.
Weight Capacity Requirements
This is a critical safety aspect. The rack must be engineered to safely support the entire weight of your dumbbell set, plus a significant safety margin. For example, if your dumbbells total 300 pounds, your rack should ideally be designed to hold at least 400-500 pounds comfortably. This dictates the thickness and type of wood, the number and strength of fasteners, and the overall structural design to prevent collapse or instability. Over-engineering slightly is always a wise choice when dealing with heavy weights.
Material Choices
The choice of materials directly impacts the rack’s durability, appearance, and cost.
- Wood Types: Plywood (¾-inch or thicker) is excellent for shelves and strong uprights due to its stability. 2x4s are economical and widely available, suitable for frames and supports. For a more premium look and increased strength, hardwoods like oak or maple are superb but come at a higher cost. Softwoods like pine are easier to work with and more budget-friendly, but may require thicker dimensions or more reinforcement for heavy loads.
- Fasteners: Wood screws (2.5-inch to 3-inch deck screws or construction screws are generally good) are essential. For heavy-duty joints, lag screws or carriage bolts might be necessary. Always use a good wood glue in conjunction with screws for superior joint strength. Pocket screws (used with a pocket hole jig) create strong, concealed joints.
- Finishes: To protect the wood from moisture, sweat, and wear, apply a durable finish. Wood stain can enhance the appearance, while polyurethane or a clear sealant provides a protective layer.
Tool Checklist
Having the right tools makes the job easier and safer. Here’s a basic list:
- Measuring Tape and Pencil: For accurate measurements and markings.
- Miter Saw or Circular Saw: For precise cuts on wood. A jigsaw can be useful for curves.
- Electric Drill/Driver: For pre-drilling pilot holes and driving screws.
- Wood Clamps: Essential for holding pieces securely during assembly and gluing.
- Sander (orbital or block): For smoothing rough edges and preparing for finish.
- Safety Gear: Eye protection, hearing protection, and work gloves are non-negotiable.
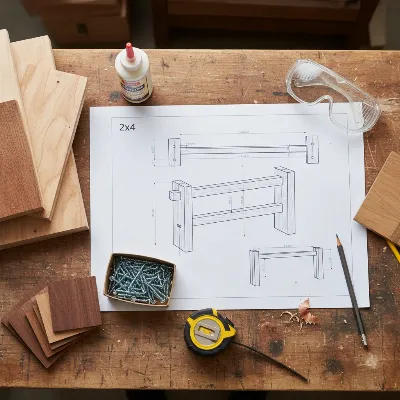 A detailed blueprint of a DIY wood dumbbell rack with lumber, screws, and tools laid out.
Designing Your Rack: Styles and Blueprints
Once you have a clear understanding of your needs and materials, the next step is to translate that information into a concrete design. Choosing the right style and creating a detailed blueprint are crucial for a successful build.
Common Rack Designs
There are several popular design styles for dumbbell racks, each with its own advantages:
- Horizontal Shelf Rack: This is arguably the simplest design, featuring flat or slightly angled shelves stacked vertically. It’s highly versatile, accommodating a wide range of dumbbell sizes, and is relatively easy to build for DIY enthusiasts. The main considerations are sufficient depth for the dumbbells and strong supports for the shelves.
- Vertical A-Frame Rack: Known for its space-saving footprint, the A-frame rack holds dumbbells in an angled, upright position. It’s excellent for smaller spaces and often has a very clean, minimalist aesthetic. Construction involves angled cuts and sturdy cross-members to cradle the weights.
- Tiered/Slanted Rack: Similar to commercial gym racks, this design typically features multiple angled tiers where dumbbells rest. This allows for easy lifting and re-racking, often making it more ergonomic. These can be more complex to build, requiring precise angled cuts and strong joinery to support heavy loads on each tier.
Creating a Plan
Regardless of the style you choose, a detailed plan or blueprint is indispensable. Start by taking precise measurements of your individual dumbbells, paying close attention to the length of the handle and the diameter of the weight plates. This will help you determine the necessary spacing between supports or shelves. Sketch out your chosen design, including dimensions for all wood pieces. Creating a cut list (a list of every piece of wood, its dimensions, and how many you need) will streamline the building process and minimize waste. Consider using free online woodworking project planners or graph paper to help visualize and refine your design.
Ensuring Stability and Safety
A dumbbell rack must be incredibly stable and safe to prevent accidents.
- Wide Base: Always design with a wider base than the top sections, especially for vertical or A-frame racks, to prevent tipping.
- Strong Joints: Prioritize strong joinery. Using wood glue in addition to screws for every joint significantly increases the rack’s strength and rigidity. Consider using techniques like dado joints, pocket holes, or even through-bolts for critical connections.
- Preventing Rolling: For horizontal or tiered racks, incorporate a lip, a shallow groove, or slightly angled shelves to prevent round dumbbells from rolling off. For A-frame designs, ensure the angle and spacing of the cross-members securely cradle the weights.
- Smooth Edges: Sand all edges thoroughly to remove splinters and sharp corners, making the rack safer to handle.
> “When designing any structure that will bear significant weight, always prioritize a robust base and redundant joinery. The extra effort in planning and reinforcement pays dividends in safety and longevity.” – David Miller, Master Carpenter and Woodworking Instructor
Step-by-Step Construction Guide
With your design finalized and materials gathered, it’s time to bring your DIY dumbbell rack to life. This section provides a general step-by-step guide; adapt these instructions to your specific design.
Step 1: Gather and Prepare Materials
Lay out all your wood pieces. Using your cut list, measure and cut each piece to its exact dimensions. Double-check all measurements before making cuts. If your design involves angled cuts, use a miter saw or a circular saw with a reliable guide for precision. Label each piece according to your blueprint (e.g., “base,” “upright 1,” “shelf A”) to avoid confusion during assembly.
Step 2: Assemble the Base and Uprights
Begin by constructing the most foundational parts of your rack: the base and the main upright supports. For horizontal racks, this might involve building a rectangular base frame. For A-frame designs, it means joining the main vertical pieces that form the ‘A’ shape.
- Apply wood glue to all mating surfaces before driving screws. This creates a much stronger bond than screws alone.
- Pre-drill pilot holes for every screw to prevent wood splitting, especially near edges or when using hardwoods.
- Use clamps to hold pieces firmly in place while you drill and fasten. Ensure everything is square and plumb before securing.
Step 3: Install Dumbbell Supports
This step is where your specific design dictates the approach:
- For Horizontal Racks: Attach your shelves or horizontal support beams. Ensure they are level and spaced appropriately for your dumbbells. You might add a small lip (a thin strip of wood) along the front edge of each shelf to prevent weights from rolling off.
- For Vertical A-Frame Racks: Secure the angled cross-members that will hold the dumbbells. The angle and spacing should allow the dumbbells to rest securely without wobbling or slipping.
- For Tiered Racks: Install the angled support rails or shelves. Precision in angle and spacing is key here for ergonomic access and secure storage.
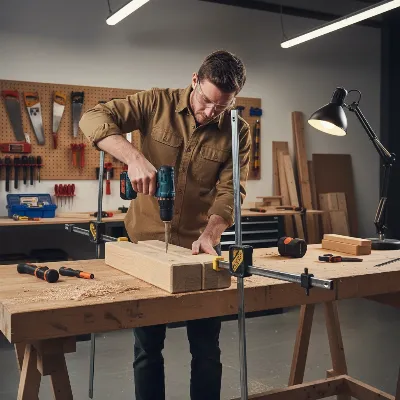 A person actively assembling a wooden dumbbell rack with a drill and clamps in a workshop.
Step 4: Reinforce Joints
Review all connections. Where possible, add extra screws or consider using pocket holes with specialized screws for added strength and a cleaner look. For heavy-duty racks, particularly those holding hundreds of pounds, reinforce critical load-bearing joints with additional bracing or metal brackets if your design allows. Remember that the combination of wood glue and screws provides the best long-term strength. Allow glue to dry completely according to the manufacturer’s instructions before proceeding.
Step 5: Sanding and Finishing
Once the rack is fully assembled and the glue is dry, thoroughly sand all surfaces. Start with a coarser grit sandpaper (e.g., 80-100 grit) to smooth out any rough spots or imperfections, then progress to a finer grit (e.g., 150-220 grit) for a smooth finish. Pay special attention to edges and corners, rounding them slightly to prevent splinters.
- Wipe down the entire rack to remove all sawdust before applying any finish.
- Apply your chosen wood stain, if desired, following the product instructions. Allow it to dry completely.
- Apply several coats of a durable protective finish, such as polyurethane or a clear sealant. Lightly sand between coats with a very fine-grit sandpaper (e.g., 320 grit or higher) for an ultra-smooth and resilient surface. This finish will protect the wood from moisture, sweat, and general wear and tear, significantly extending the rack’s lifespan.
Step 6: Final Checks and Placement
Before loading your dumbbells, perform a final inspection.
- Check that all screws are tight and secure.
- Gently push and pull on the rack to test its stability. It should feel solid and not wobble.
- Carefully place your heaviest dumbbells on the rack first to test its weight-bearing capacity. If anything seems unstable, reinforce it before adding more weight.
- Finally, position your completed DIY dumbbell rack in its designated spot, ensuring it’s on a stable, level surface.
Tips for Durability and a Professional Finish
To ensure your DIY dumbbell rack stands the test of time and looks great in your home gym, consider these additional tips:
- Choose High-Quality, Straight Wood: Inspect lumber carefully at the store. Avoid warped, twisted, or bowed pieces. Straighter wood leads to more precise cuts and a stronger, more attractive finished product.
- Use Appropriate Screws and Pre-Drill Pilot Holes: As mentioned, pre-drilling is essential to prevent splitting, especially in hardwoods or near edges. Choose screws with a coarse thread for better grip in wood and ensure they are long enough to penetrate at least two-thirds into the receiving piece of wood.
- Apply Multiple Coats of Protective Finish: Don’t skimp on the finish. Two to three coats of polyurethane or similar sealant, with light sanding between coats, will create a much more durable and resistant surface than a single coat. This is crucial for a piece of gym equipment that will be exposed to sweat and heavy use.
- Regularly Check for Loose Screws: Over time, with repeated loading and unloading of weights, screws can sometimes loosen. Periodically inspect your rack and tighten any screws that feel less secure. This simple maintenance step can prevent potential safety issues and prolong the life of your rack.
- Consider Rubber or Felt Pads: To protect your floor and the bottom of your rack, attach adhesive rubber or felt pads to the base. This also helps prevent the rack from sliding.
Conclusion
Building your own DIY wood rack for your dumbbell set is a rewarding project that offers both practical and aesthetic benefits. By carefully planning your design, selecting the right materials, and following a methodical construction process, you can create a custom storage solution that perfectly fits your workout space and equipment. Not only will you save money and enjoy the satisfaction of a handcrafted piece, but you’ll also create an organized, safer, and more inspiring environment for your fitness journey. With your new, robust rack in place, your dumbbells will always be ready for action, helping you maintain a consistent and effective training regimen. What other DIY projects could elevate your home gym experience?
Frequently Asked Questions
What type of wood is best for a DIY dumbbell rack?
For strength and durability, hardwoods like oak or maple are excellent but more expensive. Pressure-treated pine or high-quality plywood (¾-inch or thicker) are also strong, stable, and more budget-friendly options, especially when combined with wood glue and screws for robust joints.
How much weight can a DIY wood dumbbell rack hold?
The weight capacity depends heavily on the design, wood type, thickness, and joinery. A well-constructed rack using sturdy 2x4s or ¾-inch plywood, reinforced with glue and screws, can typically hold hundreds of pounds (e.g., 300-500 lbs), making it suitable for most home gym dumbbell sets. Always over-engineer for safety.
What tools do I need to build a wooden dumbbell rack?
Essential tools include a measuring tape, pencil, miter saw or circular saw for cutting wood, an electric drill/driver for pilot holes and screws, wood clamps for assembly, and a sander for finishing. Safety gear like eye and hearing protection is also crucial.
Can I build a dumbbell rack without a miter saw?
Yes, you can. A circular saw with a straight-edge guide can be used for most cuts, including angled ones if you set the blade bevel. A handsaw and a miter box can also work for smaller projects, though it will require more effort and time.
How do I ensure my DIY dumbbell rack is stable?
To ensure stability, design the rack with a wide base, use strong joinery (wood glue plus screws), and ensure all cuts are square and plumb. For taller racks, consider anchoring them to a wall if possible. Always test the loaded rack for any wobble before full use.
What’s the difference between an A-frame and a horizontal rack?
An A-frame rack is typically more vertical and compact, holding dumbbells at an angle to save floor space, ideal for smaller sets or limited areas. A horizontal shelf rack uses flat or slightly angled shelves, offering more versatility for various dumbbell sizes but generally requires more floor space.
How do I prevent my dumbbells from rolling off the rack?
For horizontal or tiered racks, incorporate a small wooden lip (e.g., a ½-inch strip of wood) along the front edge of each shelf, or design the shelves with a slight backward angle. For A-frame racks, ensure the cradling cross-members are spaced and angled correctly to securely hold the dumbbell heads.
Equipment that holds up past 60 sessions
Practical specs, not advice. Unsubscribe anytime.